Sunday, November 30, 2014

Gifty items for the Cotton Mill Guild's Fund Raising Auction - Day 1

On Monday December 8th, we will have our final guild meeting of the year.  Part of the morning's entertainment is an in-house guild silent auction of home made or crafted items made by members followed by a pot-luck luncheon.

I love to make small items so it's a natural for me to make some items.     It's not like I'm sitting down doing nothing this time of year, but I feel compelled to help our guild raise money.  It's my personal challenge to make something every day until Monday December 8th.

With the money raised, the guild buys supplies like batting and backings to make cancer quilts for the sick in our area...

So today, day 1, here's what I made for the auction.

Two small pencil case size zippered pouches with cute beaded zipper pulls.  

Come back tomorrow evening to see what I've made.


Saturday, November 29, 2014

St. Dunstan's Quilt 2015 - Week 5

Not too much progress to report this week.   We had two nights and two days without power and it's just today that I'm getting up and running again.

But the little progress I made before the power outage this week was that I did get the blocks sewn into rows.  And those rows have been pinned together to sew.   This coming week will see the rows sewn together and I will definitely be on the homestretch if I get one or two of the borders on.

I will be presenting this quilt top to the quilters on December 11th.  They have invited me to their Christmas luncheon on that day and will give me lots of time to make the binding and the label as well.

Have a great week and stay warm.

Thursday, November 27, 2014

Gifty items for the Cotton Mill Guild's Fund Raising Auction - Day 5

Another busy day for me.  So it's a very small project today.   It was easy to finish up these half made criss cross coasters.  Two sets of four.  Everyone can use these.  


Tuesday, November 25, 2014

I'm making a List!

The Cotton Mill Quilt Guild's annual Christmas pot luck and silent auction of gifty handmade items made by members, is not far away.  It's just a little over two  away.    I love to make items for this auction because the money raised goes to purchase supplies to make quilts given to cancer patients.  

So my fun goal over the next couple of weeks is to make 10 items.   Most of them you've seen me make before, but it's always fun to make them again, from new fabrics.

I'm making a list and I'll start to dig out the fabrics.  I am going to make one item each day.   Most will be sewn, and there may be a knitted item or two.   

I'm open to ideas.    When you go to a crafty sale, what items would you splurge on for a good cause?   

Watch Sunday for my first item.   


Saturday, November 22, 2014

Putting the zipper in your wallet section.

This blogpost is to help you with the zipper installation of this section of the wallet. 

 It is very similar to the pictures in the pattern, except there are no zipper ends sticking out.  We have shortened them.   This method reduces bulk in the side seams, which would have given your sewing machine problems.

Lay your prepared 7 inch zipper, with the zipper pull facing up,
along the edge of your 8 x 4 piece leaving
about half an inch on each side.
Stitch  a little less than a quarter inch using your zipper foot.  
Matching the 8" sides, place the 8 x 7.5" piece, right sides together,
over the line of stitching you just did.
Pin.  Flip over so you can see the first line of stitching.

From this side, and still using your zipper foot,
stitch a second line of stitching just inside the first line of stitching.
See where the lead of my pencil is pointed, or where my finger nail is pointed,

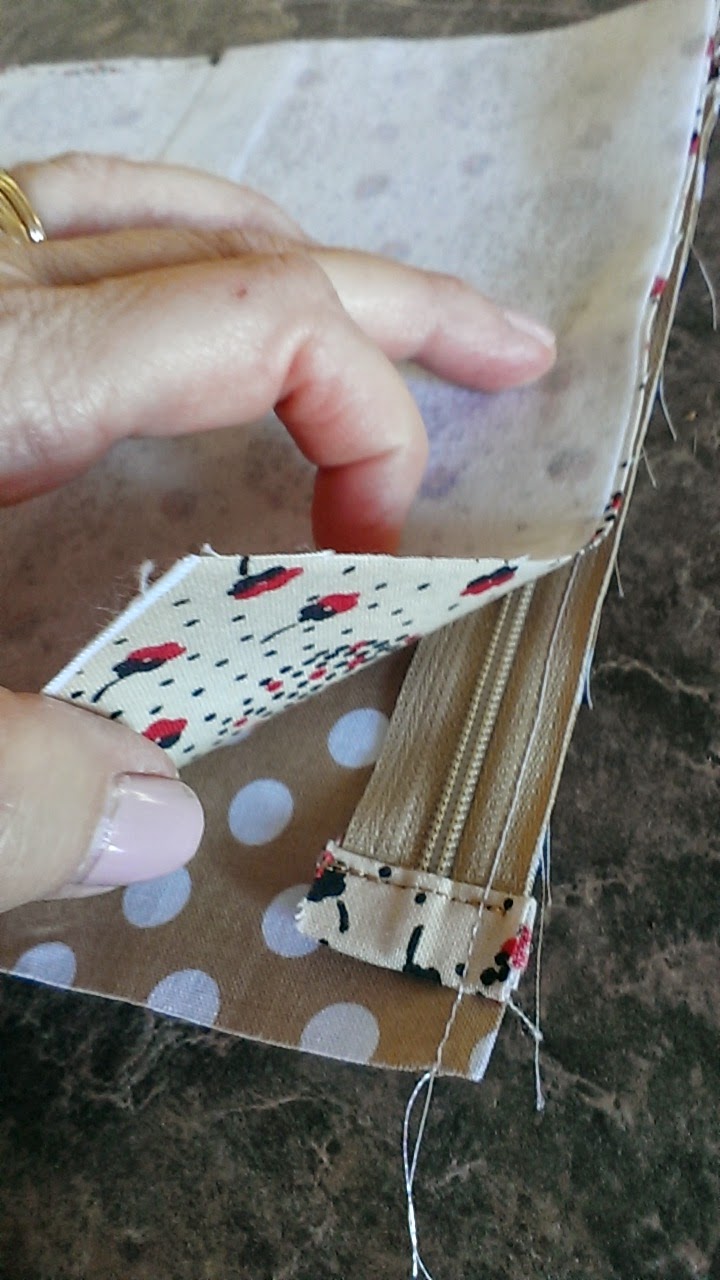
Now fold back the large piece and the small piece, and notice the side
of the zipper is now enclosed.  Press into this folded back position..
 (You will top stitch after both sides are done.)

Repeat the same on the other side of the zipper ensuring that you start with
the 8 x 4 piece, and the zipper tab is facing up!

After both sides are done, top stitch on both sides of the zipper.
Open the zipper before going on to the next step!!!


Fold both sides together so that the top edge bits are even.  Place a pin to hold the sides even.
About one inch down, Take a one quarter inch clip through all four layers.
Repeat on other side.  

Starting on one side, lift away the longer sides to reveal the two shorter pieces inside.
Match the clips exactly on the two inner pieces and and pin.  

Fold back the larger pieces and match the clips exactly, and pin.
Repeat on the other side.   You should now four pins in your piece.. two on each side.

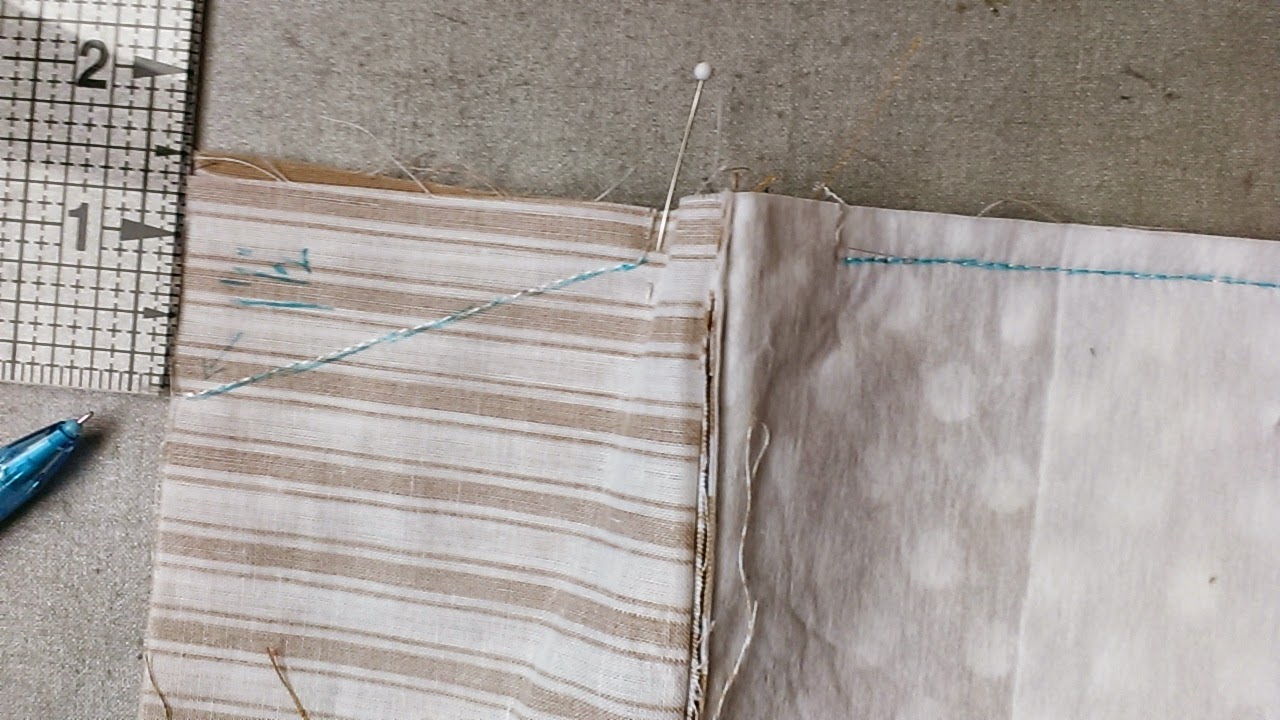
It's time to sew.  I've drawn the sewing line in blue
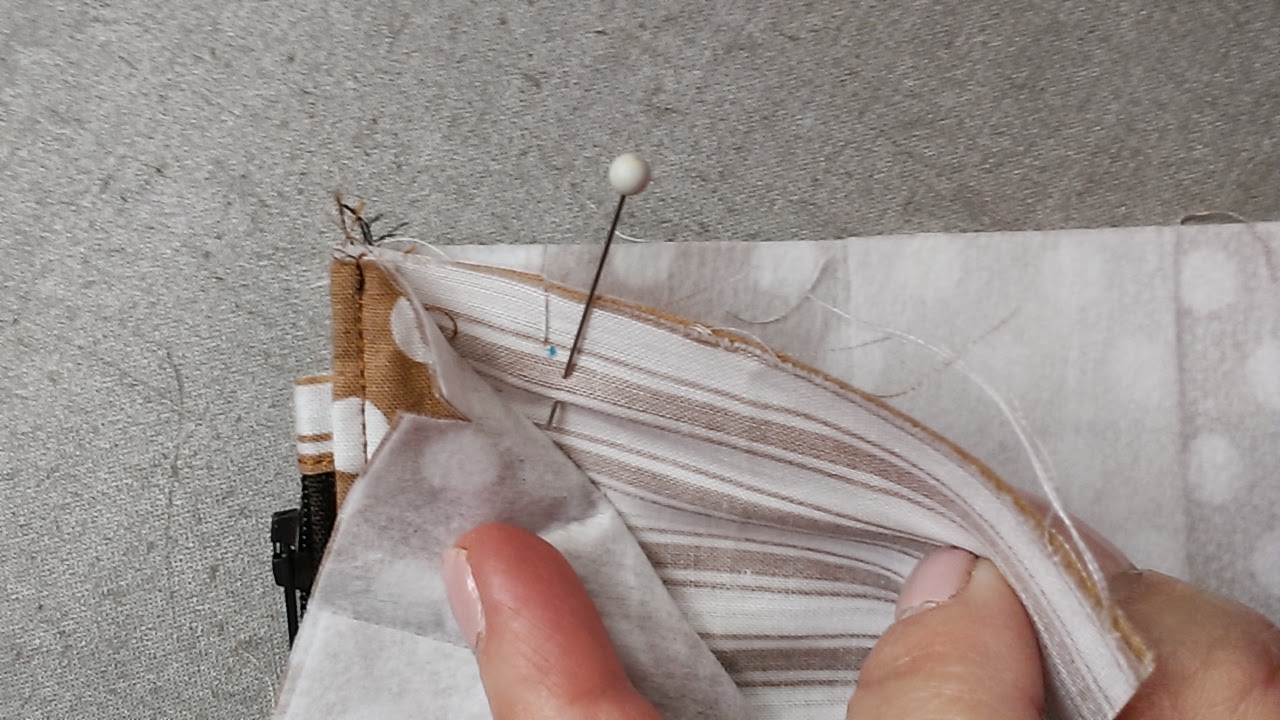
Start at the top of the shorter piece.  Take a diagonal seam starting in about 1.5".
Stitch to the first clip.  Actually stop short of the clip by one stitch...(see my blue line.)
Then, lift your presser foot and move over the bumpy seams to the next pin
(pin is not shown in this picture)  Resume stitching starting about one stitch past the clip.  Stitch
a regular quarter inch seam around the three sides stopping one stitch before the pin
on the other side.   Again, lift the presser foot over the bumpy seam and start stitching one stitch past
the clip.  Stitch the diagonal line which mirrors the starting seam.


Clip away the excess on the two diagonal seams to 1/4".  Clip the bulk
away from the two square corners.
Turn through the bottom of the shorter pieces and zipper.
Poke out the T-shirt arms... and stitch to flatten out.
If the extended part is much bigger than a quarter inch, trim to a quarter inch.
These raw edges will be hidden in the final seams on the side.
Top stitch the other end of this zipper piece.  It will be the divider end.

Now continue on with the pattern directions to mark the center of this piece
and lay into final position.

St. Dunstan's Quilt 2015 - Week 4

The borders got a little attention this week.   But I soon realized that without the center of the quilt all put together, I can't do much more than cut them out.  So it's back to the center of the quilt this week.  I have all the side triangles cut out, and the blocks have all been laid out.  I fussed over them a bit with the placement of various block colors.  But now it's all picked up and ready to sew together.

Two piles of on point blocks ready to sew
using Eleanor Burns quick method.
Thanks Eleanor!!
Eleanor Burns has the best method of laying out a quilt, then picking it up in order to be sewn together.  I'm not sure if she's documented it online anywhere, but it's very slick.  It's a good thing because I have guests sleeping in our spare bedroom tonight.  

Monday, November 17, 2014

Presenting - Winter Wonderland Quilt

If you are visiting as part of the Blogathon Canada sponsored by Sew Sisters, a sincere welcome to my blog.   I'm an avid sewer and quilter and I am delighted that you dropped by for a visit.

I've been really busy lately, and today I have a finish to show you.  It was started as a guild row-of-the-month project, some two years ago.    My dancer granddaughter, Grace, is fundraising for her dance troop. I decided to dig out this nearly done top, and I machine quilted it over the past couple of weeks.  The binding just went on this week.  Don't you think it's just sweet!

This is a free pattern designed by Natalia Bonner, and can be found on the Riley Blake website.  Click here.  


Saturday, November 15, 2014

St. Dunstan's Quilt 2015 - Week 3

This is what a pile of 50 blocks looks like. Whew, squeeked in my goal this week.   It's been a busy week.

The next logical step in this quilt will be to sew all the blocks together to make the center of the quilt.   But I've had enough block work and I think I'll work on  the borders this week instead.   Or as much of the borders as I can do.

It's a pretty light goal this week because I'd like to try to make a couple of things for our Guild's silent auction next month.

Stop by next Saturday to see how I'm doing.


Wednesday, November 12, 2014

Presenting - a Quilt for Baby Phoebe - updated

Back in June, my niece had a sweet little baby girl and she is named Phoebe.   I had intended to make a quilt for her long before now.  But the good news is, now it's done and it's made it's way to Nova Scotia.  I hope Phoebe likes and enjoys this quilt for a long time.      The pattern is from the Art to Heart book, Winsome Baby.

Edit: added Photo of Phoebe.   Such a sweet baby!!


Saturday, November 8, 2014

St. Dunstan's Quilt 2015 - Week 2

This quilt is coming along quicker than I thought, thanks to a snowy day this past Sunday.   I did get 20 blocks done and I have all the fabric cut for the remaining 30 blocks.  And my goal next week is to do those 30 blocks.    I guess if we have another snowy day, I should have no problem.   wink wink


Friday, November 7, 2014

Winter Wonderland - almost done.


Its been over a week since I've put some time on machine quilting this quilt.   It's the quilt that will be used this winter to raise money for my grand-daughter's dance troop.    With a big push on yesterday, this sweet winter quilt is close to being done.  I just have the two borders and the binding left to do.  It'll be done by the end of the weekend.  Each of the nine rows are quilted using a different free motion pattern.  I enjoyed doing it.  It's like a sampler quilt.    I've decided to leave the trees and other featured appliques puffy.  Its turning out really cute. 

Saturday, November 1, 2014

St. Dunstan's Quilt 2015 - Week 1

Today is November 1st.   I have earmarked November to sew St. Dunstan's 2015 Raffle Quilt top together.   I had suggested a design that I would like to sew.  

Well, I've changed my mind.  I don't want to sew that suggested quilt and now we are going to do a more traditional quilt.   It's a churn dash quilt.   The body of the quilt will comprise 50 churn dash 9" blocks of various colors and three borders.   It will be a good queen size quilt at 85" x 95".    I'm excited to get started.    Of all the quilts I've sewn, I don't think I've ever sewn a churn dash block.

This morning I made the test block (or three).  They're perfect.   I've picked through my fabrics and have picked out 15 or more colors that read as solids.    I'm making an aggressive plan.  Even though I have a busy week ahead, I hope to get 18-20 blocks done this week.   I have time today, so I thought I'd cut the fabrics to do 20 blocks and have them ready to sew each day this week.      So, I have three down, and up to 17 to go.  

Come back next Saturday to see how it's coming along.